Sunday, December 25, 2011

Best wishes for Christmas 2011...

Wishing all my followers, readers, visitors  a Merry Christmas and best wishes for the  New Year. May your Holidays and New Year be filled with Peace, Joy and lasting Happiness. Today we have wonderful Christmas weather here in Cary,  contrary to last years extreme winter weather that had brought  White Christmas in NC. It is cloudy with temperatures reaching mid 50s. Morning I took a stroll around home, captured few morning shots also yesterday on the Christmas eve enjoyed beautiful sunset. I am glad to share those pictures with you. Merry Christmas and Peace on Earth.


Sunset on Christmas Eve...2011.


25th December 2011....Morning 8.30 am.


Monday, December 12, 2011

French Green Lentil Curry / Dahl with Fresh Green Peanuts. (Quick Pressure Cooker Lentil Curry / Dal)

Every day Dal cooking needs some variation. I let my instincts decide what combination of lentils and beans to use.  Green peanuts with shell were in season. I got them from local Indian grocery store. Peanuts were extra large, fresh, crunchy and milky.  In Indian cooking peanuts add nice taste and texture to various curries and sabjis. I  paired  shelled green peanuts  with French green lentils, used minimal garam masala spices and made this curry / Dal.  This is simple and quick  "One whistle pressure cooker curry/ Dahl". It tastes absolutely delicious with meals or can be enjoyed as a soup.


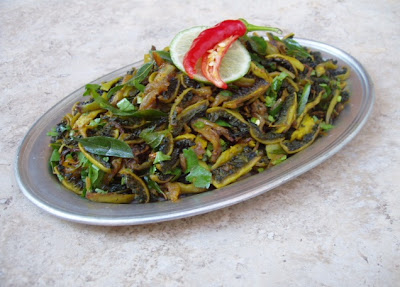
Rice and shrimp curry, Snake gourd+beetroot stir fry, French green lentil dahl.

Ingredients :
  • 1 cup - French green lentils - picked and thoroughly rinsed.
  • 3/4 cup - fresh  shelled raw green peanuts  (during off season soak regular peanuts in water for 8 hours)
  • 1 medium size onion - finely chopped
  • 4-5 - Fresh garlic cloves
  • 1.5 inch piece of ginger
  • 2-3 Green chilies
  • 1/2 T.spoon - Turmeric powder
  • 1 tiny bay leaf - 2 inch long
  • 2 cloves (lavang)
  • 1 inch piece of cinnamon
  • 1 T.spoon - corriander seeds - grind to fine powder
  • 1/2 T.spoon - cumin seeds - grind to fine powder
  • 1 Tb.spoon - oil
  • 1/2 cup - fresh chopped cilantro
  • 5-6 cups water
 Method for preparing lentil  and Green peanut curry in Pressure cooker.
  1. Check for any stone particles in French green lentil then thoroughly rinse in water. Shell green peanuts, rinse in water. Combine both in a bowl, cover with water - keep it aside. No prior soaking is required.
  2. Combine garlic, ginger, green chilies in a small blender jar,  ground to coarse mixture. Alternatively You can chop green chilies and use microplane grater to grate ginger and garlic.
  3. Combine 1 tsp corriander + 1/2 tsp cumin - grind to fine powder.
  4. Heat 1 tbsp oil in a pressure cooker / pressure pan. (minimum 3 quart size). Add two cloves, bay leaf, cinnamon stick - allow to sizzle for 25-30 seconds. Quickly add chopped onions, saute for 7-8 minutes over medium heat until onions turn soft and transparent.
  5. Now add coarsely ground ginger-garlic-green chili mixture, turmeric powder - mix and saute for 1 minute.
  6. Add corriander-cumin powder, French Green lentils and green peanuts.*Check image below* Mix and stir fry for 2 minutes over medium low heat, then add 4 cups of water. Add salt and let it simmer. Once it starts to boil, place pressure cooker lid. Remove or lift whistle while you close the lid. Once you secure and lock pressure cooker lid put back whistle. Maintain medium heat. After it blows first whistle, reduce heat to low, allow dal to simmer for 7-8 minutes. shut off the heat. Allow it to cool.
  7. When the hissing pressure sound calms downs, open the lid. Add  chopped cilantro, one cup or more water to adjust dal consistency. Check and adjust salt seasoning. Start heat on, continue to simmer for about 6-7 minutes over medium heat. Shut off the heat.  Serve with rice / roti or enjoy as a soup by adding  dollop of butter on top or drizzle some Ghee.

Picture taken during cooking step No. 6

Tazaa Moongfali / Kacche Shengdane and French Green Lentils


Sunday, November 27, 2011

Spicy Cranberry Chutney in Mustard oil - flavored with Ginger and Rosemary.

Cranberries, unique American berries are promoted as super fruit because of antioxidant properties which may help prevent urinary track infections. During thanksgiving time I had picked up  one fresh cranberry / Bounce berry  packet from grocery store, this was my first  time  to cook with fresh cranberries. I prepared  spicy cranberry chutney in mustard oil with generous use of fresh ginger and pot grown rosemary. Chutney was spicy, tangy. Fusion of mustard oil, rosemary and ginger  infused  pleasant aroma in cranberry chutney.


Ingredients :-
  • 1.5 Cup fresh Cranberries
  • Ginger - 4 inch long piece coarsely crushed (yield -3/4 cup)
  • 3-4 Garlic cloves
  • 5-6 green chilies
  • 1 Tb.spoon heaped - Fresh rosemary leaves
  • 1 T.spoon heaped - Brown sugar
  • 1/2 T.spoon salt
  • 2 Tb.spoon mustard oil
Method for preparing spicy Cranberry Chutney :-
  1. Pick vibrant, plump cranberries, wash and pat dry. Cut each cranberry into half or place cranberries in a zip lock bag , gently stroke with hammer/pestle, you just need to lightly crack/pound  each cranberry. ( I suggested cutting/ pounding Cranberries to avoid popping  in the cooking process) If you want to enjoy the fun of seeing cranberries popping then  avoid cutting/pounding but  stay safe as cranberries pop/splatter while cooking.
  2. Combine green chilies, garlic, ginger and crush to a coarse mixture. Keep it aside.
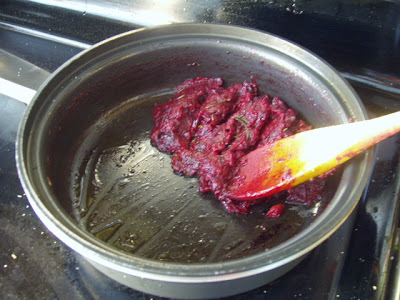
  3. In a small size saute pan heat 1 tablespoon mustard oil. Add  half tablespoon Rosemary leaves - sizzle for 20 seconds. Drop cranberries,  increase  the heat to high  and stir fry for 2 minutes. Add 1/2 teaspoon salt  and 1 heaped teaspoon brown sugar. Reduce heat to medium - cook  uncovered for about 10-12  minutes, stirring occasionally, while sauteing press cranberries with back of the spoon and bring chunky texture. Check picture below to see the texture and consistency of cranberry mixture. After it turns into  thick mass remove pan from heat and keep it aside.
  4. Heat another small saute pan with 1 tablespoon mustard oil, to that add remaining half tablespoon rosemary leaves, sizzle for 20 seconds. Quickly add crushed coarse mixture of ginger+garlic+green chilies, mix and saute by frequently stirring, until mixture emits wonderful ginger+rosemary aroma, about 4-5 minutes on medium low heat.
  5. Combine both mixtures in the first pan, saute for 2-3 minutes over low heat. Enjoy ginger infused cranberry chutney with meals or use it as spread in sandwiches also you can use this chutney in soups, curries, stir fries to bring sourness.
Note:-
I used rosemary leaves without chopping but later realized that I should have finely chopped to avoid rough texture of  leaves while eating. Salt and brown sugar quantity can be increased to suit to your taste.

Stir fried cranberries in mustard oil (L) and 
sauteed ginger, garlic, green chilies and rosemary (R)

Cranberry / bounce berry Chutney with Indian twist.

Spicy Cranberry and Ginger chutney.
Cranberry Chutney in Mustard oil
^-^^-^-^-^-^-^-^-^-^-^-^-^-^-^-^-^-^-^-^-^-^-^-^-^-^-^-^-^-^^-^

Friday, November 18, 2011

Oven Broiled / Roasted Bitter Melon stir fry for a chilly autumn weather / Karela subzi.

Yesterday I cooked Bitter melon stir fry with some twist from regular cooking method. I used  two different  cooking methods, that is - use of oven  and  stove, two cooking steps and later combined results of both cooking processes. Karela subzi / bitter melon stir fry was more tastier than stove top method.  If you don't like bitter melon, do make  an effort to develop liking because bitter melon is one of the best herbal remedy for diabetic management. It contains lot of nutrients and medicinal benefits. This is healthy stir fry to enjoy during chilly autumn days.
Last two weeks we are enjoying extra warm summer like weather around Triangle  but today  (Friday 18th November) early morning temperatures dropped below 30F,  it was frosty morning, frost was formed on the lawn and ground,  it froze water from the pot saucers. Last few days  birds were frequenting those water filled pot saucers to quench their thirst.  Please scroll down to enjoy  this   simple moment of winter scenery.


Ingredients :-
  • 1.5 lb Bitter gourd (6-7 medium size bitter melon/ karela/ pavakka/ Kaipakka/ Hagalkai, Karle)
  • 1 extra large sweet onion - partly cut lengthwise and partly chop finely. (yield 2.5 cups) I used sweet onion from RealSweet  brand produced by Shuman Produce,Inc.
  • 5-6 sprigs of curry leaves
  • 4-5 Green chilies thinly slit lengthwise
  • 1 T.spoon - heaped turmeric powder
  • 1 T.spoon - vinegar (I used white wine vinegar)
  • 1 T.spoon Garam masala ( I used 1/2 tsp garam and 1/2 tsp Goda masala, use your choice of masala blend)
  • 1 Tb.spoon oil + some more to spray over bitter gourd.
  • 1 Cup - finely chopped fresh cilantro for garnish
Method of Preparing oven broiled bitter melon Stir fry
  1. Wash Bitter gourd, pat dry. Chop both ends, make one lengthwise center cut - remove all hard formed seeds, if seeds are tender then just leave it. Make 4-5 lengthwise strips in each half portion, cut 1 inch long strips. For more ease you can make one horizontal cut. You can cut into disc shape too. Thinly slit green chilies - mix with bitter melon strips.
  2. Set oven on high broil setting. Place upper rack 8-10 inches away from upper coil. Arrange  all Karela strips evenly in a single layer in the baking pan. Spray oil, sprinkle some sea salt. Toss several times to coat bitter gourd pieces with oil and salt. Position tray in the center and close oven door.
  3. Broil bitter gourd 15 to 20 minutes, turning-stirring  them  2-3 times  during broiling. I broiled until edges turned crisp but inside was still moist. You may increase broiling time If you need extra crispy Karela texture.
  4. While bitter melons are broiling in the oven, heat  1 tablespoon  oil in a medium sauce pan over medium heat. Drop one single curry leaf, check if it sizzles with splashing noise. Carefully throw in half the quantity of curry leaves, stay back because they splash oil, allow to sizzle for 20-25 seconds and drain them on paper towel. Do this in two or three batches, depending on size of your saute pan. Curry leaves will turn bright green and crisp.
  5. In the same saute pan add chopped / sliced onions - saute on medium heat until they soften and few partially turn slight brown.I choose to use sweet onions to bring natural sweet taste. For more sweet taste sprinkle sugar or brown sugar while baking bitter melon.
  6. Add 1 teaspoon vinegar, 1/2 teaspoon garam masala, 1/2 teaspoon goda masala, turmeric powder, little salt. Stir and saute for one minute. Shut off the heat, allow to cool down.
  7. Take out Karela baking tray from oven, Mix onion mixture gently with baked bitter melon. First do with wooden spoon and later use fingers and coat evenly over karela pieces. Now add crisp curry leaves, mix well and return baking tray back to oven. Set oven back to low broil setting and broil for another 7-8 minutes. shut off the heat and let it sit inside the oven for another 10 minutes. Before serving with roti / rice garnish with fresh chopped cilantro. Enjoy and stay fit in winter.
Ready to get out of oven.

Karele ki subzi

Karlyachi Bhaji
'~~'~~'~~'~~'~~'~~'~~'~~'~~'~~'~~'~~'~~'~~'~~'~~'~~'~~'~~'~~'~~'

Unusual warmer temperatures in November brought many new
small birds around home in search of water.
Cute eastern Bluebird
Frosty morning froze water in the pot saucer.
Pictures taken around 8 am on 11/18/11


Saturday, November 12, 2011

Kerala Delicacy - Kappa with Cilantro Fish curry.

Tapioca/Kappa and fish curry combination is a  very  popular staple dish  of Kerala and is regularly cooked   in my kitchen. Recently we are not getting good quality Tapioca, each time half the quantity is wasted due to stained and porous texture. This time I was lucky to get very fresh Tapioca from local Mexican store. I cooked kappa stir fry and fish curry. Instead of cooking fish curry in Kerala style, I cooked  Cilantro fish curry. I used less spices and packed this curry with lots of cilantro, use of coconut paste gave thick and creamy texture to the curry. This is delicious curry for cilantro lovers.


Ingredients :-
  • Surmai (Spanish mackerel / Seer Fish/ ayakura) - 10-12  small pieces. (any other fish is fine)
  • 1 medium onion - finely chopped.
  • 5-6 fresh garlic cloves
  • 1.5 inch - fresh ginger piece
  • 4-5 green chilies
  • 20-25 cilantro stalks/stems - 2 inch long
  • 2 Cups tightly packed chopped fresh cilantro leaves + 1/2 cup extra - finely chopped  for final garnish.
  • 1 Cup lightly packed fresh grated coconut or use 1/2 Cup coconut milk.
  • 1/2 T.spoon - turmeric 
  • 1 Tb.spoon oil
Spices
  • 1 Tsp corriander seeds
  • 1 Tsp cumin seeds
  • 3 cloves
  • 1.5 inch long - bay leaf
Grind above four spices to fine powder.

Method of Preparing Cilantro Surmai Curry.
  1. Grind one cup fresh coconut with one cup chopped cilantro to fine paste by adding 1 cup water. Keep it aside. If you are using coconut milk, mix finely chopped one cup cilantro in the coconut milk.
  2. Combine Garlic, ginger, green chilies, cilantro stalks, 1 cup packed fresh chopped cilantro.( ingredients marked in Green color) Finely crush/ coarse dry paste to prepare base for Cilantro Green Masala (Hara Masala/ Hirva Masala). You may add 1-2 tablespoon water while grinding if needed. Keep it aside.
  3. Marinate  Surmai pieces with 1/2 teaspoon turmeric, 1 tablespoon above Cilantro Green Masala and very little salt.Keep it aside.
  4. Heat 1 tablespoon oil in a medium size saute pan.(not bigger than 8" diameter) Add finely chopped onions, saute over medium heat for 5-6 minutes. Add powdered spices - saute for one minute.
  5. Now add crushed green masala paste, stir fry for one minute.
  6. Place all marinated surmai pieces in the pan and gently mix-coat with onion, green masala base.Sprinkle little salt. Cover the lid and allow to cook over medium low heat for 4-5 minutes. Make sure there is little moisture in the pan, you may add 1-2 tablespoon water before closing the lid.
  7. Pour in 3/4 of the coconut-cilantro paste. Mix well, Check salt level. Cover the lid and let it simmer for 7-8 minutes at medium low heat.
  8. Remove the lid, gently turn around surmai pieces. Add remaining coconut-cilantro paste, remaining half cup  extra fine chopped cilantro. Simmer for 3-4 minutes. Shut off the heat and let curry sit for half an hour before serving it warm with Kappa/rice/roti.
Note : You can cook veggies, tofu, Paneer,Lentils and beans in the same Green cilantro Masala base. Check earlier blogged cilantro infused Buckwheat+moongbean+quinoa curry.

Cilantro infused Surmai fish curry

Kappa Stir fry Recipe :-

Earlier I have blogged recipe for Tapioca/Kappa curry. I have cooked this tapioca  stir fry based on  the same recipe,  only change I made is, cooked  more dry Kappa stir fry.
Recipe :- Heat 1 tablespoon oil in a thick gauge pot. Sizzle mustard seeds for 20 seconds. Add  10-12 curry leaves,   1 teaspoon turmeric powder and  3-4 chopped green chilies, saute for 40 seconds. Add  one cup heaped chopped onions; saute for 5-6 minutes over  medium heat. Add 4 cups chunks (1 inch chunks) of tapioca, sprinkle salt. mix well - saute on high heat for 3-4 minutes stirring often with wooden spoon. Now add 1.5 cup water, 2 tablespoon fresh grated coconut.(For genuine Kerala flavor add 1 teaspoon coconut oil at this stage.This is optional.) Once water starts to boil, lower the heat to medium - cook covered  for 10-12 minutes. Do stir occasionally to avoid burning tapioca at bottom. Remove lid and over  medium low heat cook until all water has evaporated. Finally add 6-7 roughly chopped curry leaves, half cup fresh grated coconut. Adjust salt level.  Mix well . Put the lid back, Shut off the heat, let it sit for ten minutes. Serve warm with fish curry or enjoy tapioca stir fry  in a bowl.

Kappa/Cassava stir fry

Kappa and Meen curry

Wednesday, October 26, 2011

Best Wishes for Deepavali... & Pictures of Nine Dot Rangoli with Diya decorations.

Today is  the Festival of lights, Diwali signifies the victory of lights over darkness and  of truth over dishonesty and of happiness over sorrow. Let the world  work towards this Deepavali Spirit to bring peace, equality and justice. May this Festival of Lights bring blessings of Joy, Prosperity, Peace and Good health to all my followers, readers and visitors.  You all have a wonderful New Year.
Yesterday I enjoyed drawing nine dot Rangoli, for me it is therapeutic art form and gives me immense pleasure. I had limited choice of colors but it worked good for  this one inch spacing - 9 dot rangoli. I used  single vinyl sheet to draw this Rangoli. I pasted it on  bigger size white color thick paper. First I made rough sketch of design then made final outline with white Rangoli, later slowly filled Rangoli colors. I used individual small size tiles to do surrounding decorations with diyas. Enjoy the Rangoli pictures with Diya decorations. 


 Picture of completed Rangoli before starting Diya decorations.


 Time to lit  Diyas.


Thanks for watching...Shubha Deepavali.

Tuesday, October 25, 2011

Five Day life cycle of Parasol mushroom growing in the backyard. [ Summer 2011 Lawn mushroom pictures. Post - 2 ]

Summer 2011 has been wonderful  year for mushroom growth in Cary, NC.  I have already posted Puffball mushroom images earlier. This Parasol mushroom was growing near my patio in the lawn, just 15 ft away from home so it was easy to observe it growing every day. I spotted it on 23rd Sept  and clicked until it dried and withered away on 27th September. Enjoy viewing beautiful life form of Parasol mushroom.

 I spotted pair of  Parasol mushroom.
 (Macrolepiota procera)[1st Day] ..23rd Sept-2011]

[1st Day] - One more picture from another angle.

[2nd Day]...[24th Sept-2011]

one more picture. [ Day -2 ]

[ Day -3]....25th Sept -2011]

Mushroom shrivelled up ..[Day-4] [26th Sept-2011]

Mushroom withered away. [ Day-5 ] [27th Sept -2011]
^*^*^*^*^*^*^*^*^*^*^*^*^*^*^*^*^*^*^*^*^*^*^*^

This is little different than above  Parasol Mushroom 
(Lepiota procera)
 still to open fully. [27th Sept, 2011]

Above mushroom next day. (28th Sept, 2011)
^*^*^*^*^*^*^*^*^*^*^*^*^*^*^*^*^*^*^*^*^*^

 Some random single mushroom (10/01/2011)

Above mushroom after five days...(10/06/2011)
-:-:-:-:-:-:-:-:-:-:-:-:-:-:-:-:-:-:-:-:-:-:-:-:-:-:-:-:-:-:-:-:-:-